Fortescue rethinking expansion that endangers Australian sacred site
Australian iron ore major Fortescue Metals Group (ASX: FMG) said on Friday it would re-evaluate an expansion plan at one of its iron ore mines in the Pilbara region, after an Indigenous group said the project threatened sacred sites, including a 60,000-year-old rock shelter.
Fortescue’s decision comes after fellow miner Rio Tinto (ASX, LON, NYSE: RIO), the world’s number one iron ore producer, blew up in May a 46,000-year-old sacred indigenous site in Western Australia.
While the company has apologized, chief executive officer Jean-Sebastien Jacques revealed on Friday it had other options, but rejected them.
Rio’s boss acknowledged that the move allowed the company to access about 8 million tons of high-value iron ore. The world’s second-largest miner recorded about $4.6 billion in profits from its iron ore unit in the first half of the year.
In light of the global uproar Rio’s blasting caused, Fortescue has asked the government to delay a decision on a heritage exemption request, which is part of a mine expansion plan. The project would threaten sites of cultural significance to the Wintawari Guruma people.
The planned Queens mine expansion, part of the Solomon project, has a footprint covering more than 70 heritage sites, including rock shelters, campsites and rock paintings and engravings.
Testing of stone tools and other artifacts, found more than a metre below the surface at the site, showed the first two rock shelters’ use and occupation by humans dated back 47,800 years ago in one, and approximately 60,000 years in the second, The Sydney Morning Herald reported in June.
CEO Elizabeth Gaines said in a call with analysts that the company’s primary objective was to avoid cultural heritage damage. She added that Fortescue had consulted with local indigenous groups before designing the mine plan in question.
“As a result of this constructive consultation, we expect to achieve avoidance of significant cultural heritage beyond the current two-year mine plan,” Gaines said.
Fortescue says it has protected almost 6,000 Aboriginal cultural heritage places across its operations.
Solar ambitions
The company is also gearing up to test whether it can run its Pilbara-based Christmas Creek iron ore mine on solar, alone, during the day
Alinta Energy, the miner’s partner in the project, says it is confident the goal can be achieved.
The solar farm is part of a major project that will extend the Alinta transmission line that runs from the Newman gas generator to Roy Hill mine by another 65 kilometres to Christmas Creek and Cloudbreak.
Jaw dies can either be turned end for end or replaced depending on their wear. The jaw dies can be turned once after their installation before they need to be replaced.


Fixed Jaw Die
- Clean the jaw die lifting holes. Remove stones and sand from the jaws. Remove material packed between the jaw and side plates.
- Hold the jaw die up with a hoist and lifting hooks.
- Remove the upper hex nuts (55) and the spring packages.
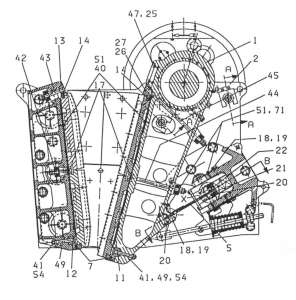
- Remove T -head bolts (43), tightening wedge (13), and upper wedge (14). Be careful not to drop the jaw die as it may personal injury and cause damage to the crusher.
- Remove the lower hex nuts (55) and the spring packages.
- Lift out the upper jaw die.
- Remove T -head bolts (42) and tightening wedges (17).
- Lift out the lower jaw die.
Movable Jaw Die
- Clean the jaw die lifting holes. Remove stones and sand from the jaws. Remove material packed between the jaw and side plates.
- Hold the jaw die up with a hoist and lifting hooks.
- Remove the upper hex nuts (55) and the spring packages.
- Remove T-head bolts (44), tightening wedge (26), and upper wedge (14). Be careful not to drop the jaw and cause damage.
- Remove the lower nuts (55) and the spring packages.
- Lift out the upper jaw die.
- Remove T -head bolts (44) and tightening wedges (17).
- Lift out the lower jaw die.
Assembly
- Before re-assembly make sure that the support surfaces are clean. The jaw dies should be in continuous contact with the support surfaces.
- Replace or turn worn parts. If the ends of the jaws are distorted or bent, the original dimensions must be achieved by torch cutting before re-assembly.
Fixed Jaw Die
- Replace the lower jaw die. Replace the tightening wedge (17) and T-head bolt (42).
- Replace the spring packages
- Snug the lower T-head bolt with hex nut (55) lightly.
- Replace the upper jaw Die.
- Replace the upper wedge (14), tightening wedge (13) and T-head bolt (43).
- Replace the spring packages.
- Make sure that there is a clearance of 3/16″-5/16″ (5-8 mm) between the upper and lower jaw dies and that the tightening wedge (17) has not bottomed out.
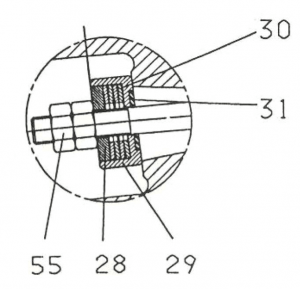
- Tighten the spring packages using hex nut (55). The spring packages are properly compressed when the bottom of the Spring Washer Housing (29) is flush with the bottom of the Spring Retainer (28). Secure with a “double” nut (55).
- Check the tightening after 8 operating hours.
- Movable Jaw Die
- Replace the lower jaw Die.
- Replace the tightening wedge (17) and T -head bolt (44).
- Replace the spring packages.
- Snug the lower T-head bolt with hex nut (55) lightly.
- Replace the upper jaw die.
- Replace the upper wedge (14), tightening wedge (26) and T-head bolt (45).
- Replace the spring packages.
- Make sure that there is a clearance of 3/16″-5/16″ (5-8 mm) between the upper and lower jaw die and that the tightening wedge (17) has not bottomed out.
- Tighten the spring packages using hex nut (55). The spring packages are properly compressed when the bottom of the Spring Washer Housing (29) is flush with the bottom of the Spring Retainer (28). Secure with a “double” nut (55).
- Check the tightening after 8 operating hours.
NOTE! The tightening sequence:
First pre-tighten the lower bolts and adjust the clearance between the upper and lower jaw die 3/16″-5/16″ (5-8 mm). Tighten the upper bolts and then lower ones. If the tightening wedge has bottomed out and there is no clearance, torch cut a piece from the jaw dies.
After every jaw die change or rotation the crusher setting must be checked. The tension on the return rod spring must be checked and adjusted if necessary. Refer to dimension “L” in the table Length of Spring.
@Nick Sun [email protected]
Post time: Aug-14-2020

